EZ DOCK

IMPORTANT TIPS

Check out these important tips to keep your EZ Dock looking as good as the day it was installed! Each tutorial is designed to teach you the tips and tricks for easy installations, adjustments, and maintenance.

Installing couplers takes no time at all with our helpful installation tips and learn how to smoothly dock your PWC with an EZ Port. Learn the tricks to quickly installing a Hinge Kit, adjusting your EZ Port Rollers and keeping them maintained to make launching your watercraft a breeze. Let us teach you how to maintain your dock and tighten and remove couplers. We’ll want to help you make the most of your purchase so check out all of our important tips!

Got Questions? We’ve got answers! If you don’t see them here contact us!


TIPS & TRICKS WE HAVE LEARNED

So you want to keep your EZ Dock looking like new? Maintaining your dock is easier than you’d think. We recommend simply using a power washer in with the high-pressure stream of water to remove any dirt and grime. A good high-pressure power washer should clean your docks without any soap or cleaner most of the time.

For a quick-fix cleaning solution, use a brush, a mild cleaning agent and a little H2O. Scrub down your dock and you’re good to go. For stubborn stains, a diluted bleach solution or a biodegradable cleaner like Simple Green should do the trick.

NOTE: It is normal to see algae on the waterline of your EZ Dock. Algae will not harm your EZ Dock.

Maintaining and Cleaning Docks

A hinge kit comes with two connection points – each hinge has a hinge plate and a J Bracket. To attach the J Bracket to the EZ Port insert it in the top pocket with the hardware connector in the bottom pocket. This secures the part of the hinge that is mounted on the EZ Port. The other half of the hinge is a flat bracket with holes for lag bolts. The two pieces (J Bracket and Hinge Plate) are joined using a hinge pin which slides through the two pieces and is secured with a cotter pin. Be sure to use included 5/8” stainless steel flat washer as a backing plate behind the cotter pin. This prevents wear on the cotter pin from dock movement (see above photo).

Once installed, it is easy to remove the Port from the floating dock – you simply pull out the cotter pin and then slide out the pin which will disconnect your EZ Port.

TIP: Marking the location for the lag bolts will save you lots of installation time. So mark them well!

EZ Installation Steps:

  1. Mount the J Bracket and secure it to the EZ Port
  2. Slide the hinge pin through the J Bracket and the hinge plate then secure it with a cotter pin
  3. While standing/kneeling on the EZ Port, hold the hinge plate against the existing floating dock and mark where the lag bolts will be located

KEY: Make sure no one is on the dock you are attaching to and that your weight is on the EZ port when you mark the position for the lag bolts. This negative load will then insure that when your PWC is on the EZ Port the back end will rise and keep the jet drive completely out of the water. It is critical to make sure that you have a negative load on the installation when you mark the spot for the lag bolts.

Note: Depending on the freeboard of your existing floating dock, the hinge plate can be mounted in the up/raised position (above the J bracket) or at the same height as the J Bracket.

One hinge kit is adequate for securing up to three EZ Ports ® depending on the degree of rough water at the site.

hinge kit for EZ port installation

Installation Tips

Building a floating dock is easy with EZ Dock of for all your floating dock building plans and designs. Below is a quick tip on coupler installation.

  1. Insert Coupler Bolt through bottom coupler section (square recess) and use hammer to set bolt into recess of bottom coupler.
  2. Load bottom of coupler & bolt assembly into coupler installation tool.
  3. Slide between dock sections and align coupler bolt with hole in dock pocket (start in center of dock and position tool for removal through open pocket side of dock).
  4. Pull bottom coupler assembly into dock pocket until hole in coupler tool is visible (you can put a screwdriver into this hole to keep tool in position.
  5. Put coupler nut onto coupler bolt and screw down at least three turns.
  6. Use coupler pull-up tool or claw hammer to seat bottom coupler into bottom coupler pocket.
  7. Remove coupler nut and insert coupler top into pocket being careful not to put excessive pressure that would push bottom coupler back out.
  8. Use hammer or mallet to firmly seat top coupler into dock pocket.
  9. Use the EZ Dock coupler installation tool and a 15/16″ socket to tighten the coupler nut. Be careful not to over-tighten coupler nut.
  10. Slide coupler installation tool out through the un-coupled side of dock. You may need to tilt tool as shown to free it from bottom coupler.


Docking Tips for a Personal Watercraft – The EZ Port MAX 2i leads the market in PWC docks with a significant market share due to the fact that it handles any PWC provided today and even some larger models that are no longer in production such as the Yamaha and Seadoo SUV 4 seaters. With plenty of flotation to keep the entire PWC out of the water, it is the most friendly to the hull of your PWC. Adjustable rollers require no maintenance. These rollers can be custom-tuned to your PWC model. They can be easily re-arranged if you ever change your watercraft.

In the videos below are examples of the proper docking technique and an example of how easy it is to launch the PWC. When docking, ease up to the first roller in the water, stop, then provide a little throttle to climb the machine on to the dock. Since the EZ Port has rollers your hull does not contact the dock, only the rollers.

Tightening Couplers

If you are in rough water locations take a few minutes in the Spring and make sure all ofpicture of EZ Dock socket adapter for coupler nut your coupler nuts are tight.

EZ Dock is designed to move “with” rough water much like a caterpillar moves across a surface. If you want to see the advantage in using EZ Dock visit our gallery of videos and watch EZ Dock in a hurricane.

The couplers allow the dock to move and flex in rough water which could loosen nuts that hold the top and bottom connector together. Simply snug them up and you are good for another season. To tighten a coupler nut you need the socket adapter that fits on a standard 3/4″ socket and drive – do not over tighten as you can break the poly bolt, just snug it up.

The socket adapter is part number 900005. The official name of the part is DRIVE TOOL SOCKET FOR COMPOSITE PRODUCT.

Removing Couplers


If you are removing couplers for any reason remove the nut on the top coupler, tie a stringpicture of EZ Dock Coupler Tool around the threads of the bolt that the nut was covering and rock the dock by standing over the connection point. The bottom coupler will drop out and you can retrieve the bottom coupler and bolt easily for re-use.

Uncoupling the EZ Dock Sections is simple

To uncouple EZ Dock section you will need a socket adapter tool which fits on a standard 3/4” socket drive. The tool is an adapter that will fit the coupler nut that holds the top and bottom coupler together between the dock sections. The socket adapter has a star shapped pattern that is designed to fit into the same pattern on the coupler nut.

The black couplers (some people call the dog bones due to their similar shape) consist of a top coupler, bottom bottom coupler and a black plastic poly bolt and nut. The only “trick” to taking the dock sections apart is not to lose the bottom coupler which can fall out if you do not use a string on the coupler bolt for retrieval (see note below regarding string).

Simply back off the plastic nut and remove the top coupler with a flat screw driver prying it out of the dock pocket. This will expose the black poly bolt that is left – do this for each coupler in the line that is holding the one dock section together. Only disconnect one dock at a time.

  • There are six couplers if docks are joined side to side
  • There are four couplers between the 80″ X 10′ dock sections
  • There are three couplers between a 60″ X 10′ dock sections
  • There are two couplers between the 40″ X 10′ dock sections

Remove only one row of coupler nuts at a time (one dock section at a time).

Once you have the nut and top black coupler removed tie a string using a “slip knot” around the threads of each coupler bolt that is exposed and replace the coupler nut over the string. Stradling the two dock sections that are joined rock the docks and the coupler bottom and bolt will fall out. Keeping the string in your hand pull the string between the docks and bring the couplers to the top of the dock (otherwise the bottom coupler and bolt will fall to the bottom – they do not float).

Pipe Brackets

Pipe brackets can be removed in a similar manner – the Heavy Duty pipe brackets use couplers, the Light Duty pipe brackets use screws to join the upper and lower pieces.

Piling Brackets

Piling brackets can be disconnected easily.

Hinge Kits

Hinges kits simply have a cotter pin and straight pin that is removed to separate an EZ Dock that was connected to a wood dock.

Dock Cleats

Cleats on a dock make it easy to secure the dock section after it is disconnected from the system and the cleats are strong enough to allow a dock section to be lifted by dock lines on the cleats if you have a way to hoist the dock section.

Otherwise just pull the dock section on to what dock is left and then carry it from the water via the gangway or beach path.

Increasing the Efficiency of your EZ Port 2, 3 and 4

We hear from customers that over time, it becomes more difficult to launch your watercraft.  The solution is simple.

There are two things you can do to eliminate this problem and make launching and docking easy for any owners:

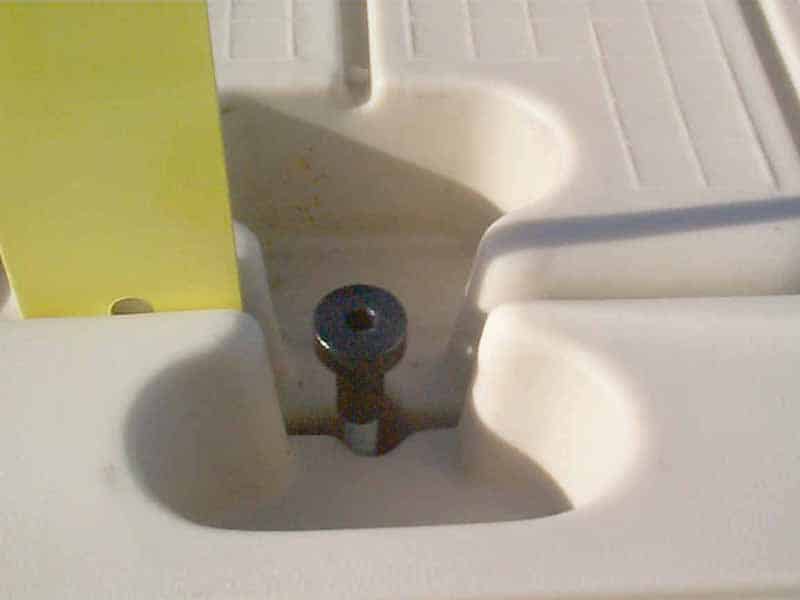
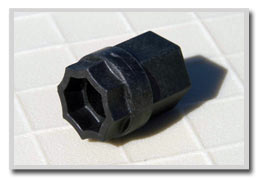
1. Grease the rollers each year – this requires a special tip that will fit on any grease gun and you can use the Lincoln Grease Needle LNC-5803 (see photo below). This part is available from several online tool stores on the web (google the phrase above) and we also try to keep these in stock. You might also be able to pick  one up from your local auto parts store.  The grease inlet hole on the roller is about 3/16″ in diameter.  If it is clogged with dirt or debris that prevents the grease from going in, try cleaning it out with a 3/16″ drill bit.

grease needle

Lincoln Grease Needle LNC-5803

port-3

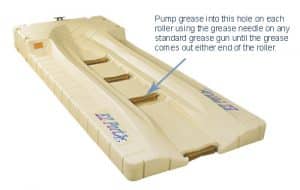
2. Adjust the rollers – the watercraft should be resting on the rollers, not the dock. If they are adjusted properly the machine will rock slightly from side to side when on the dock which keeps the watercraft off the dock while launching or docking. There are several roller adjustments you can make that either raise or lower the rollers with the third roller (on the Port 3) the most critical.

Please see this document for additional details.

NOTE: Be sure to use the proper technique for pushing your watercraft off.  We have found that if you grab the steering handle and pull it back until it locks with your bow-side hand and then place your other hand on the watercraft seat and push with your legs, even the heaviest watercraft are much easier to push off.

Leave your EZ Docks in during the winter

Ice has no affect on the EZ Dock System. Since an EZ Dock requires only an inch of water to float, the docks will “pop” to the top of the ice when the water freezes, much like an ice cube tray.


Many times a cracked or punctured EZ Dock section can be repaired by simply melting the polyethylene dock material with a torch or plastic welding iron (a large hot metal iron that melts the plastic together). Occasionally we have customers that have punctured or cut the dock with bullets, boat propeller from an outboard engine or some other accident and we use an old dock section to piece a repair and melt that into the open hole. If you have stress cracks near coupler pockets they normally occur after constant large storms due to extreme pressure on the dock. At times these cracks can be repaired in the same manner, melting the material together, but if it is in place that receives a lot of stress it may not hold.

The EZ Dock system includes couplers which are designed to break before a dock section cracks which is the reason the docks are provided with an 8 year warranty. EZ Dock is the most durable dock system available today and issues regarding cracks from storm damage are extremely rare.

You also have a “weep hole” on the end of each dock section that allows the dock to change pressure inside as atmospheric conditions change outside. At times in rough water we have seen water enter the docks through the weep hole but this is normally in salt water applications where waves are bouncing off a bulkhead and back into the dock system. This year EZ Dock introduced a new vent (see attachment) which can be used that will prevent any water from entering the dock regardless of rough water conditions. These can be inserted into a hole in the end of the dock while you seal the original “vent hole” that has been included since the docks were invented 20 years ago. You can plug the old vent hole with any silicone material similar to bathtub caulk.

Draining docks is a simple process – drill a hole in one corner on the edge of the dock near the top, drain the water, and purchase a threaded plastic plug from Home Depot of the same size you make the hole, the plug will prevent water from entering the dock through the drain hole you created. Since the entire dock section is an open chamber only one hole is required to drain the entire dock.